On this page
Why scratches happen, and why AI fixes them better
Scratches on old photos come from real life: being carried in a wallet for 40 years, stacked loose in a shoebox, stuck to the back of a frame with tape, rubbed against each other in a drawer, or chewed on by the family dog in 1978. Every scratch sits on top of real image data that is usually still intact underneath. Photoshop's clone stamp can hide a scratch by painting over it with nearby pixels, but the patch is obvious once you look closely. AI repair is different: it actually rebuilds what was under the scratch, using what skin, fabric, or hair is supposed to look like. That is why AI repairs look invisible, not airbrushed.
- Save $50 to $150 per photo vs a local restoration shop
- Rebuilds what was under the scratch, does not paint over it
- Works on deep scratches through faces, not just minor surface marks
- Fix a whole shoebox for the price of one pro repair
- Creates a permanent digital copy that can never scratch again
What to expect
The five most common kinds of damage (and how AI handles each)
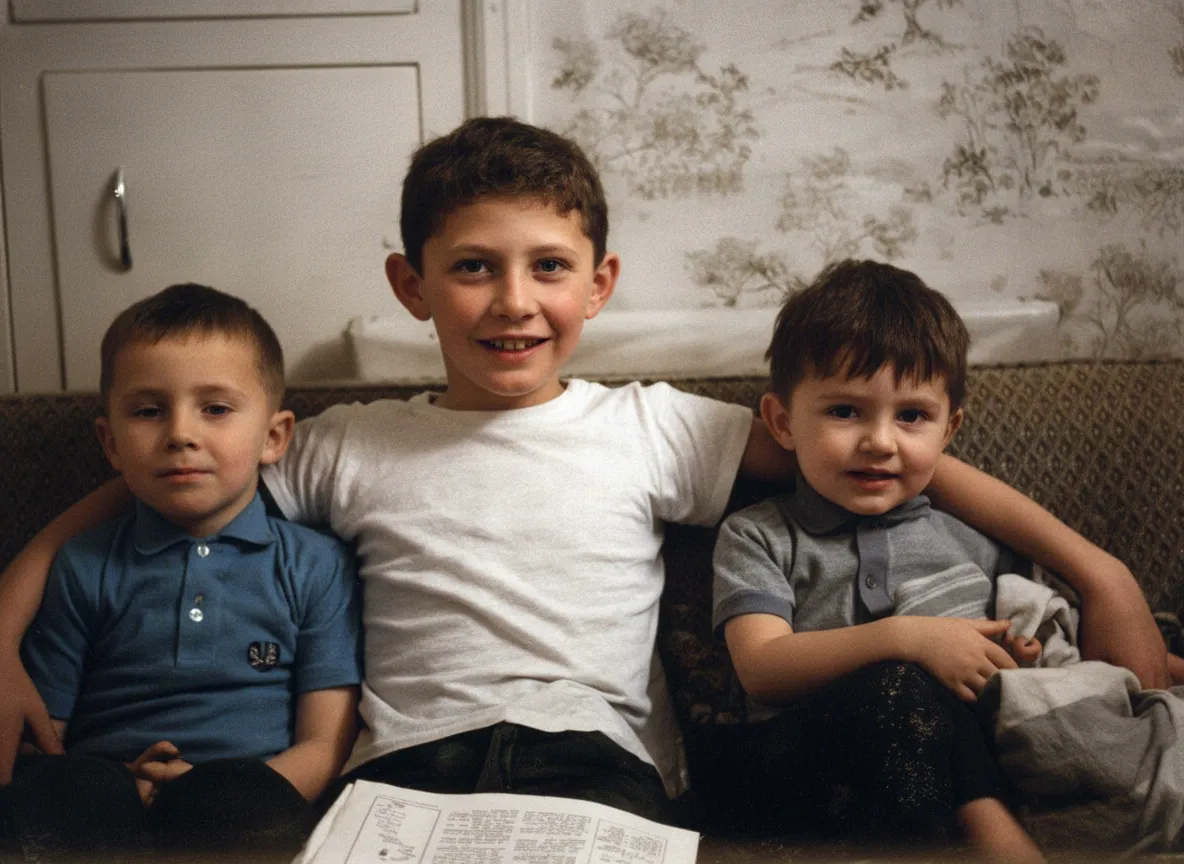
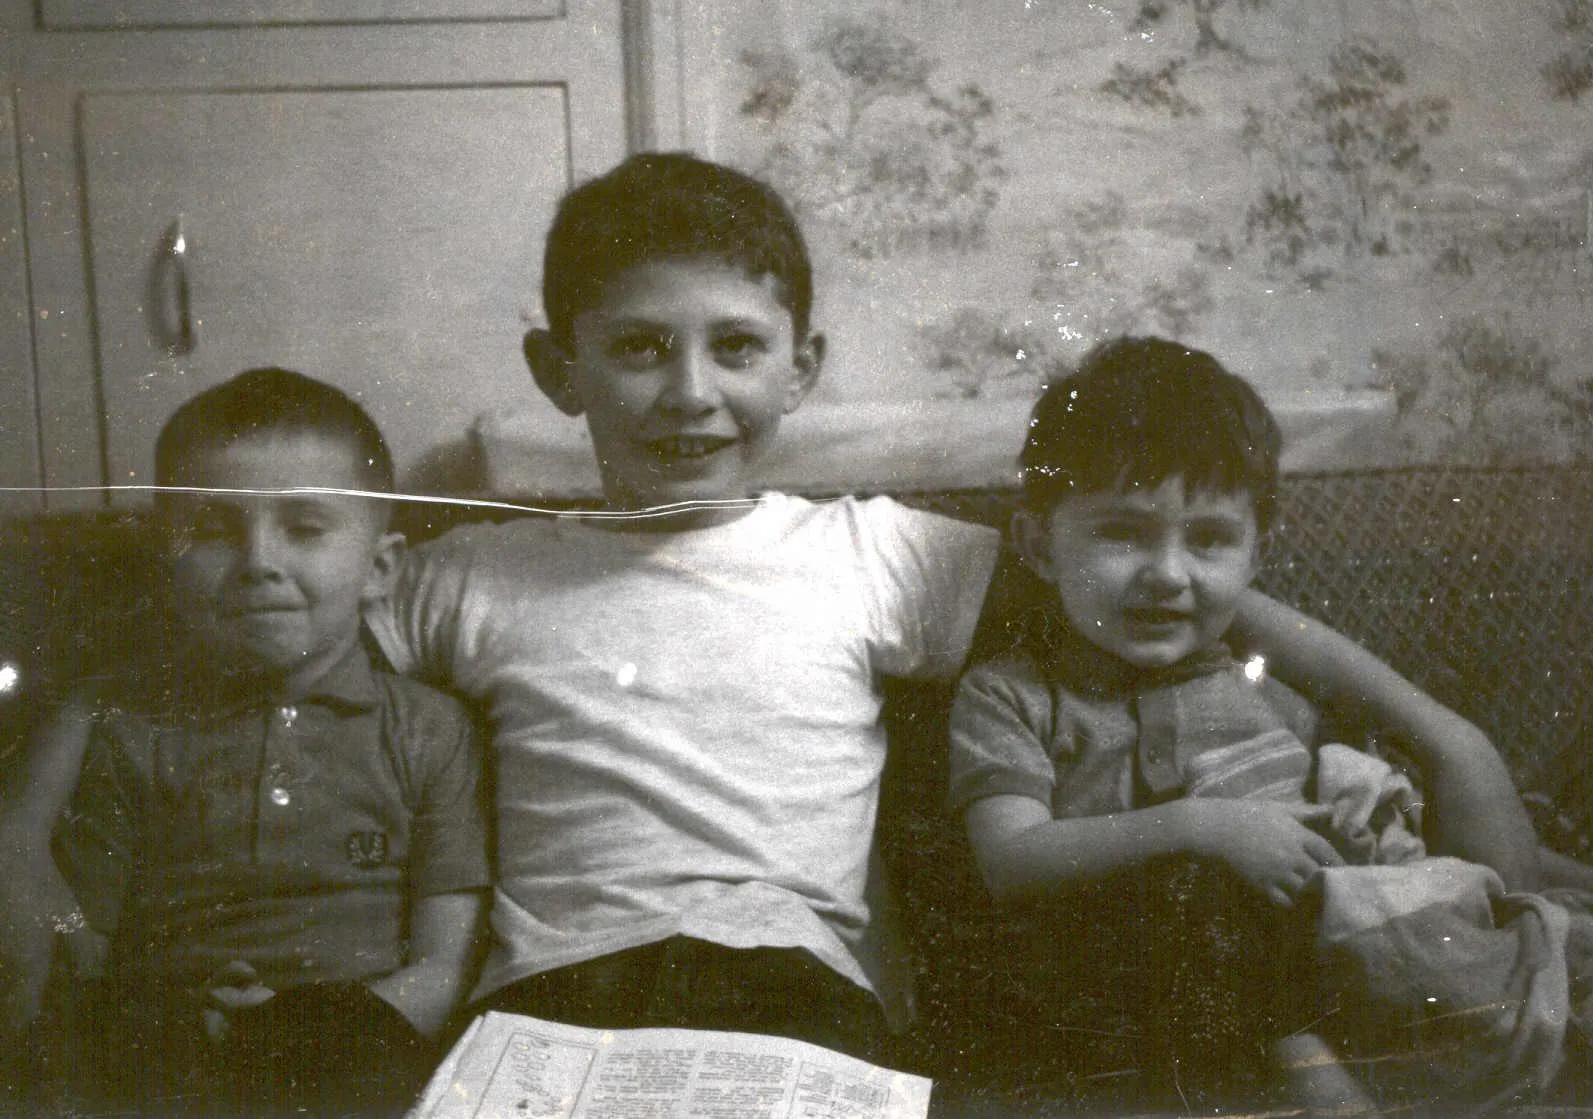
White scratches and creases. The classic "line across the face" damage. These come from prints being folded in wallets, stacked in albums with pages sticking together, or rubbing against other prints in a box. The AI lifts them cleanly off faces, skin, and clothing, even deep ones. Expect near-invisible results.
Torn corners and missing edges. Common on heirloom photos that were stuck to an album page and pulled off. The AI rebuilds torn corners using the surrounding photo as context. If the missing area is a background or clothing, the reconstruction is indistinguishable. If it is part of a face, the AI fills in a plausible face, but it is a reconstruction, not a perfect recovery of that specific person.
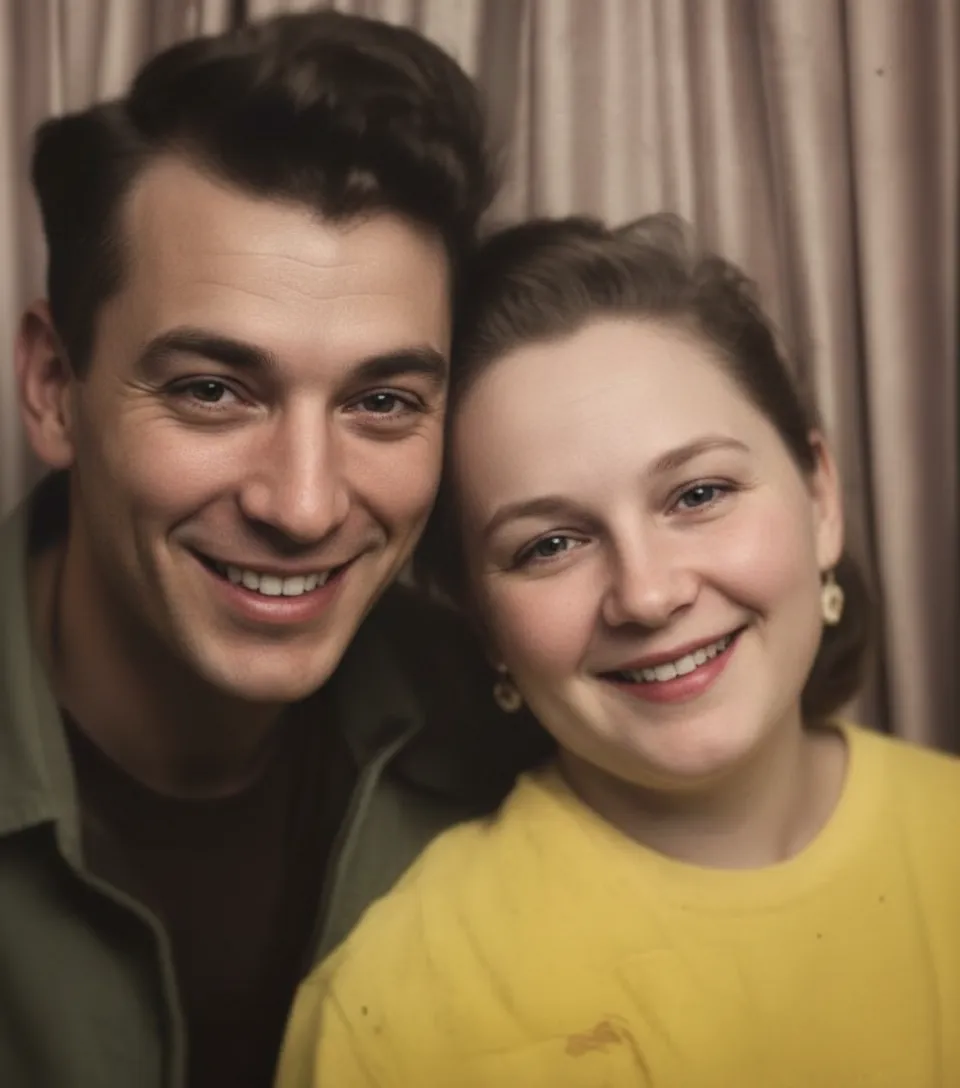
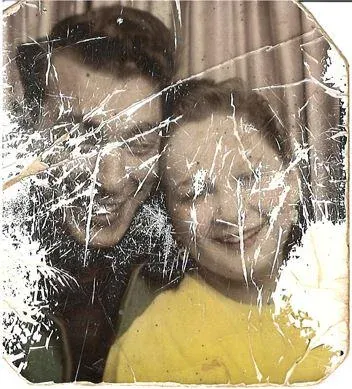
Brown water stains and mold spots. Basement floods, attic leaks, hurricane damage, flooded storage units. The brown blotches look permanent but are actually where AI beats hand retouchers the hardest. The AI recognizes the chaotic stain pattern as separate from the real image and lifts it off in one pass. A face obscured by a brown water mark usually comes back clean.
Tape marks and adhesive residue. Photos pulled out of sticky albums, taped into shadow boxes, or stuck to the back of frames often have glossy yellow marks and paper fiber residue. The AI recognizes these as surface damage and removes them along with the scratches.
Heavy creases and folds. Prints that were carried in a wallet or mailed in a letter often have deep vertical creases splitting the face or body. The AI rebuilds the crease line using the image on either side. Expect excellent results even on creases running right through an eye or nose.
“My grandma cried when she saw her wedding photo restored. Absolutely incredible.”
Maria K.
“Uploaded a blurry photo from the 70s and got back a crystal clear image. Like magic.”
James T.
“Finally recovered old family photos I thought were lost forever. So easy to use.”
Sarah M.
How it works
3 simple steps.
AI Scratch Removal
Erases the scratch. Rebuilds what was under it.
Photoshop's clone stamp just copies nearby pixels over the scratch. Look closely and you see the smudge. Our AI is different. It knows what skin, hair, eyes, fabric, and backgrounds actually look like, so when it lifts a scratch off a face, the face underneath looks real, not painted over. A deep scratch through your grandmother's cheek disappears. A white crease running across a wedding dress disappears. The photo looks like the scratch was never there.
- ✦Scratches across faces, skin, and eyes
- ✦White creases from being folded in albums or wallets
- ✦Long scratches from being stored loose in shoeboxes
- ✦Scuffs, dust marks, and hairline cracks on the print
Works on Worse Damage Too
Tears, water stains, and torn corners too.
Most old prints do not just have one clean scratch. They have years of damage layered on top: a corner torn off when it was stuck to another photo, a brown water stain from a basement flood, tape marks from a shadow box, mold spots from an attic. Our AI handles all of it in a single pass. Upload the worst photo in your shoebox and see what comes back.
- ✦Torn corners and missing edges rebuilt automatically
- ✦Water stains, mold spots, and brown discoloration removed
- ✦Tape marks, stuck-together damage, and adhesive residue
- ✦Deep creases through faces repaired invisibly

For Families & Genealogists
Start with the photo you think is hopeless.
A local restoration shop charges $50 to $150 per photo and takes weeks. Photoshop takes hours per photo and real skill. We charge $0.13 per photo on the Family plan, and your free account comes with 2 repairs. Spend those free credits on the photo that looks ruined, like a grandparent's wedding portrait with a crease through a face, a baby photo with a ripped corner, or a brown-stained print from a flood. If the result impresses you, the rest of the shoebox is safe.
- ✦Perfect for inherited albums, flood-damaged boxes, and heirloom prints
- ✦2 free repairs on signup, no credit card
- ✦One-time pricing, no subscription, credits never expire
- ✦30-day money-back guarantee on every credit pack
In-depth guide
How to remove scratches from old photos, step by step
Start with a light clean. Use a dry microfiber cloth or a photo-safe brush to lift loose dust off the surface. Do not use water, alcohol, or household cleaners, they can damage the emulsion. If the photo is stuck to glass or to another print, do not force it apart. Scan it as-is and let the AI handle the damage. Forcing stuck photos apart usually rips the emulsion and makes things much worse.
Digitize the print. A flatbed scanner at 600 DPI in color mode (even for black-and-white prints) gives the AI the cleanest input. No scanner? Your phone works. Lay the photo flat, stand directly above it, and shoot in bright window light, not ceiling light (ceiling light adds a yellow cast and creates reflections). If the print is curled, flatten it overnight between two heavy books before scanning.
Upload to restorephotosapp.com/restore and pick "Repair" mode. Thirty seconds later you see a draggable before-and-after slider. Zoom in on the scratch, tear, or stain to see exactly how the AI handled it. Happy with the result? Download full resolution. Still some residue? Upload the result for a second pass (one more credit). The second pass is often the difference between "good" and "perfect."
If the photo also has heavy fading or a yellow/orange color cast on top of the scratches, run "Restore Old Photo" first to fix the color, then "Repair" on that result for the scratches. Two focused passes always beat one mixed pass.
Water-damaged photos (basement floods, hurricane boxes, attic leaks) need special care before you even scan. If the print is still damp, air-dry it face-up on a paper towel in a cool room for 24 hours. No hair dryers, no sun, no heat, they permanently warp the emulsion. Once dry, scan and upload normally.
For photos torn into pieces, reassemble them face-down on the scanner. Line up the tear as closely as you can, then close the lid gently. For photos torn into three or more pieces, join the back with acid-free archival tape before scanning. Never tape the front. The AI treats a carefully aligned reassembly as one photo and rebuilds the tear line.
After repair, save two copies: one to cloud storage (iCloud, Google Photos, Dropbox), one to a local external drive. The whole point of scratch removal is that the damage is now permanent only in digital form. Two separate backups is the archival standard. For prints, use a real photo lab on archival paper, not a home inkjet.
Inherited a whole album or shoebox? Use the Family plan ($19.99 for 150 repairs) or Studio plan ($49.99 for 450 repairs). Batch-upload the photos you care about, come back for the results, and download everything as a ZIP. For genealogy projects, this is the fastest way to digitize and repair an entire family archive in a single weekend.
Expert tips
Quick tips for the cleanest scratch removal
Start with the photo you think is ruined
Your free credits are best spent on the photo that looks hopeless, a crease through a grandparent's face, a torn wedding portrait, a brown water-stained baby picture. The bigger the "before," the bigger the "after." You will know immediately if the AI is good enough for the rest of your collection.
Do not force stuck photos apart
Prints stuck to glass, to each other, or to album pages often rip if you pull them. Scan them as-is and let the AI rebuild the torn surface. Forcing stuck photos apart is the #1 way people accidentally destroy family heirlooms.
Dry water-damaged prints before scanning
For prints from a recent flood or water leak, air-dry them face-up on paper towels in a cool room for 24 hours. No heat, no sun, no hair dryers, they permanently warp the emulsion. Once dry, scan and upload normally.
Scan at 600 DPI (or 1200 for small prints)
Military portraits, wallet photos, and old school photos are often 3x5 inches or smaller. At 300 DPI, a face is only a few pixels across and the AI cannot tell a scratch apart from a freckle. At 600 to 1200 DPI, it has enough data to repair cleanly.
Flatten curled prints overnight
Ten minutes under a book is not enough. Leave curled photos overnight between two heavy hardcovers and they will scan flat the next morning. Flat scans avoid shadows that the AI can mistake for extra scratches.
Tape torn pieces together on the back
For photos torn into pieces, reassemble them face-down and join the back with acid-free archival tape. Never tape the front. Scan the reassembled photo and the AI will rebuild the tear line like it was one photo.
Scratches + fading? Restore first, then repair
If your photo has both color fading and physical damage, run "Restore Old Photo" first for the color, then "Repair" on the result for the scratches. Two focused passes beat one mixed pass.
For heirlooms, colorize after repair
Once the scratches are gone, run your cleaned black-and-white portrait through "Colorize B&W" to see a grandparent or great-grandparent in full color, often for the first time in your family's history. A repaired and colorized portrait is a favorite gift for anniversaries, Mother's Day, and memorial displays.
Pricing
One-time pricing. No subscription. Credits never expire.
One-time payment
Starter
$0.50 / credit
Perfect for trying it out on a few precious photos.
- 10 Credits Included
- Restore 10 Photos
- High-Resolution Output
- Credits Never Expire
- Free Digital Frames
- 30-Day Money-Back Guarantee
100% Money-Back Guarantee
One-time payment
Pro
$0.50 / credit
For restoring a small album of memories.
- 30 Credits Included
- Restore 30 Photos
- High-Resolution 1080P Output
- Credits Never Expire
- Free Digital Frames
- 30-Day Money-Back Guarantee
100% Money-Back Guarantee
One-time payment
Family
$0.13 / credit
Save 74% per credit
Restore your entire family photo collection.
- 150 Credits Included
- Restore 150 Photos
- High-Resolution 1080P Output
- Credits Never Expire
- Free Digital Frames
- 30-Day Money-Back Guarantee
100% Money-Back Guarantee
One-time payment
Studio
$0.11 / credit
Save 78% per credit
For entire archives, professionals, and power users.
- 450 Credits Included
- Restore 450 Photos
- High-Resolution 1080P Output
- Credits Never Expire
- Free Digital Frames
- Priority Support
- 30-Day Money-Back Guarantee
100% Money-Back Guarantee
Prices don't include VAT.
FAQ
Frequently asked questions
My grandparent's wedding photo has a scratch through her face. Can AI fix that?
Yes, and this is the exact case AI handles best. Scratches through faces usually lift off cleanly because the real image data is still there under the scratch. The AI rebuilds the skin, eyes, and hair that were hidden. Deep, long scratches repair almost as well as short hairline ones.
Can it remove a crease that folds the whole photo in half?
Yes. Heavy center creases from photos that were folded in wallets or mailed in letters are one of the cleaner repairs. The AI has image context on both sides of the crease, which gives it enough to rebuild the line in the middle. A crease right through an eye, nose, or mouth usually disappears completely.
My photos got wet in a basement flood. Can anything be saved?
Often yes, but dry them first. Air-dry flood-damaged prints face-up on paper towels in a cool room for 24 hours. No heat, no hair dryer, no sun. Once dry, scan and upload. The AI recognizes water stains and brown discoloration as separate from the real image and lifts them off, even when the stain covers a face.
I have a photo with a corner ripped off. Can AI rebuild it?
It depends on what was in the missing corner. If the missing area is background, sky, clothing, or a wall, the reconstruction is indistinguishable from the original. If the torn corner contained part of a face, the AI fills in a plausible face, but it is a reconstruction, not a perfect recovery of that specific person. For most torn corners on family photos, results are excellent.
Can it fix a photo torn into multiple pieces?
Yes. Line up the pieces face-down on your scanner and tape them together on the back with acid-free tape. Never tape the front. Scan the reassembled photo and upload. The AI treats it as one photo and rebuilds the tear lines.
Can I remove tape marks from old photos?
Yes. Glossy yellow tape marks, paper fiber residue, and adhesive marks from shadow boxes or album corners are all surface damage the AI removes along with regular scratches. For heavy tape marks, you may need a second pass.
My photos are stuck together. Do I pull them apart first?
No, do not force them. Stuck photos often rip the emulsion when pulled apart, which makes the damage much worse. Scan the stuck pair as-is (you will only get the top photo) and let the AI handle any damage that shows. For professional separation, a conservation specialist can sometimes separate stuck photos with controlled humidity, but this is expensive and not always successful.
Can I remove pen or marker marks kids drew on a photo?
Yes, for most surface markings. Ink and marker ink usually sit on top of the print surface, so the AI treats them like any other surface damage and removes them. Permanent marker on glossy prints repairs very well. Marker that soaked into a matte print may leave faint color shifts after repair.
Is there a free way to try it?
Yes. Every new account comes with 2 free repairs and no credit card is required to sign up. Spend those free credits on your most damaged photo so you can see the full effect before buying anything.
How much does it cost to repair a box of photos?
First 2 repairs free. After that: $4.99 for 10 ($0.50 each), $14.99 for 30, $19.99 for 150 ($0.13 each), or $49.99 for 450 ($0.11 each). For a typical shoebox of 50 to 150 photos, the Family plan at $19.99 is the right fit. For an entire family archive, the Studio plan at $49.99 covers 450 repairs.
Do I need Photoshop?
No. No Photoshop, no Lightroom, no editing skill, no clone stamp, no YouTube tutorials. The AI runs in your browser. Upload, wait 30 seconds, download.
Can I do it on my phone?
Yes. Open restorephotosapp.com in Safari or Chrome on your iPhone or Android. Take a clear photo of the damaged print in bright daylight (or upload a scan from your camera roll), pick "Repair," and save the result back to your phone in 30 seconds.
Do I have to scan the photo, or is a phone photo fine?
Both work. A flatbed scan at 600 DPI gives the cleanest result, but a phone photo in bright window light is very close, especially for medium and large prints. If you do not own a scanner, most libraries and copy shops scan for $1 to $2 per photo.
How long does it take?
Under 30 seconds per photo. For a batch of 20, you can either do them one by one (about 10 minutes) or upload them all at once and come back to download the ZIP.
Will the repair look obvious?
No. The AI rebuilds skin texture, fabric, hair, and backgrounds so they continue naturally through where the scratch used to be. The repair is invisible, not airbrushed. Most people cannot tell a photo was repaired.
Is it better than hiring a local restoration shop?
For 90% of typical scratch, crease, stain, and tear damage, yes. A local shop charges $50 to $150 per photo and takes weeks. We charge $0.13 per photo and take 30 seconds. A shop may still be worth it for extreme cases with huge missing sections or severely warped prints, but those are rare.
Will the result be good enough to print and frame?
Yes. Output is full resolution. Pro, Family, and Studio plans include 1080P output, which prints beautifully at 8x10 and larger. A photo too damaged to frame before can usually be framed after repair.
Can I repair a 1940s photo from my grandfather?
Yes. Prints from the 1940s (black-and-white silver gelatin photos) are one of the most common kinds we repair. They often have fading on top of scratches. For best results, run "Restore Old Photo" first to fix the color and contrast, then "Repair" on the result for the physical damage.
Can I fix a very old photo (1800s or early 1900s)?
Yes. Tintypes, daguerreotypes, ambrotypes, cabinet cards, and early albumen prints all work. These often have extensive physical damage layered on top of fading, so the two-pass workflow (restore first, then repair) gives the cleanest results.
What happens to my photo after I upload it?
Photos are transferred securely over HTTPS and stored privately on Cloudflare R2. Originals and repaired versions stay for 30 days so you can re-download them, then they are automatically and permanently deleted. We never share your photos with anyone and never use them to train AI models.
Can I colorize the photo after repair?
Yes. Once the scratches are gone, run the cleaned photo through "Colorize B&W" to see a grandparent or great-grandparent in full color for the first time. A repaired and colorized portrait is a favorite gift for anniversaries, Mother's Day, memorial displays, and shadow boxes.


