Where do photo creases come from?
Wallets are the #1 source. A photo folded in half to fit a billfold gets a permanent center crease from the first week. After 10-20 years of daily sitting-on and opening-closing, the crease deepens and often develops into a partial tear. The #2 source is mailing. Before digital cameras, people mailed photos in regular envelopes. The postal machinery bends and creases the envelope, and the photo inside gets one or two fold lines. #3 is album insertion, where a tight photo corner bends the print as you slide it in. #4 is storage damage: a heavy book placed on top of a photo in a drawer, or a box where the bottom photos are crushed by the weight of everything above.
- Wallets: center fold from being carried daily, deepens over years
- Mailing: fold lines from postal sorting and handling
- Album corners: bends from being inserted or removed from tight corners
- Storage pressure: crushed under weight in boxes and drawers
- Child handling: bent, folded, and sometimes partially torn by kids
What to expect
Can you iron a creased photo? No. Here is why.
This is the most common question about creased photos. An iron melts the emulsion (the image layer on the front of the print). Even on low heat, even with a cloth between, the emulsion softens and the image sticks to whatever surface it touches.
Steam introduces moisture that warps the paper base. A hair dryer on warm does the same. The only safe method is mechanical pressure: stack heavy books on top of the photo overnight. This flattens the paper for scanning but does not remove the crease line in the image.
AI is the only thing that removes the crease line itself. It reads the image on both sides of the crease and generates matching content through the gap. A crease through a forehead gets filled with matching skin. A crease through a suit gets filled with matching fabric.
“My grandma cried when she saw her wedding photo restored. Absolutely incredible.”
Maria K.
“Uploaded a blurry photo from the 70s and got back a crystal clear image. Like magic.”
James T.
“Finally recovered old family photos I thought were lost forever. So easy to use.”
Sarah M.
How it works
3 simple steps.
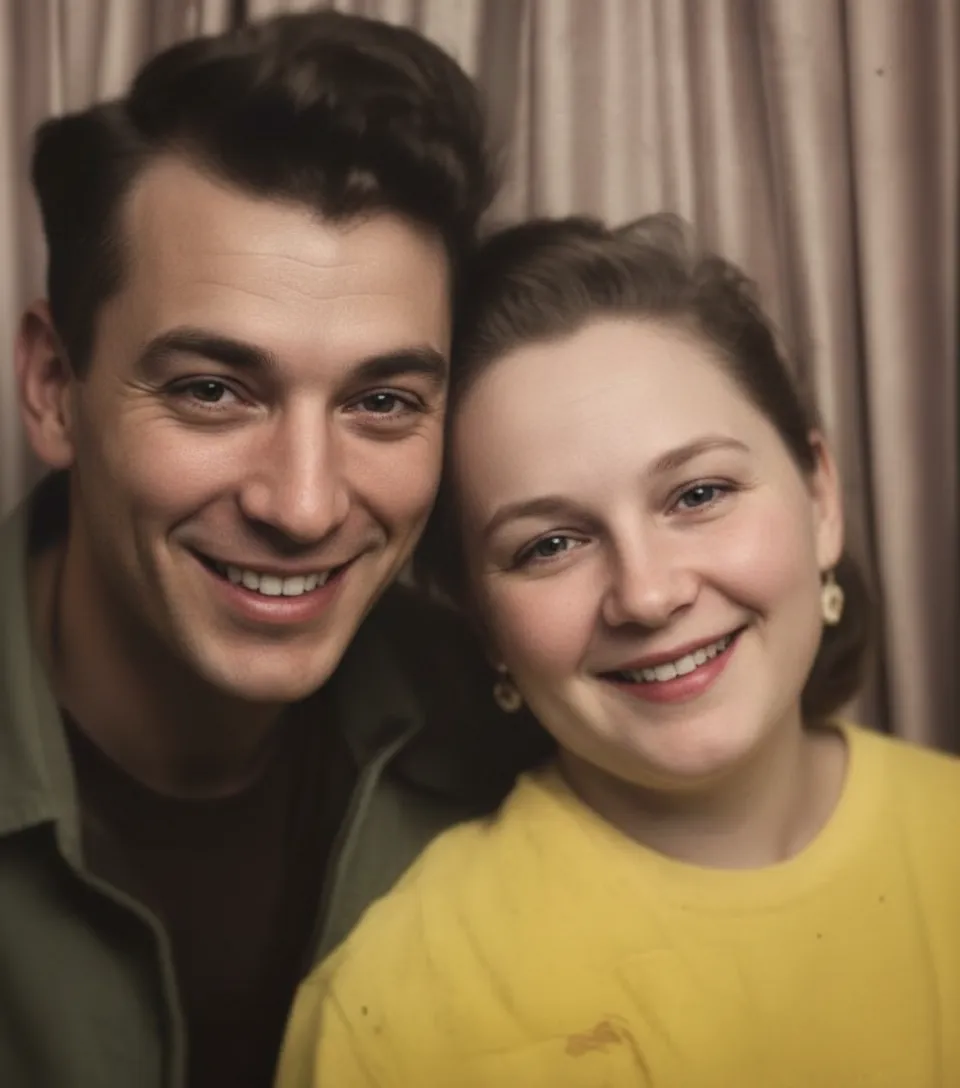
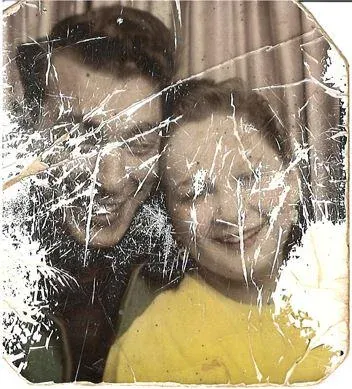
Wallet Photos
The photo you carried for 20 years deserves better.
You folded it to fit a wallet and carried it for years. Now a white crease line runs through the face. AI reads the skin tone and texture on both sides and fills the gap. The crease disappears. The face is whole again.
- ✦Center-fold creases from being folded in half
- ✦Multiple parallel creases from years of opening and closing
- ✦AI fills with matching face detail, not a blur or smudge
Can I Iron a Photo?
No. Here is why, and what actually works.
No. An iron melts the emulsion. A hair dryer warps the paper. The only safe method: heavy books on top overnight. This flattens for scanning, but only AI removes the crease line itself.
- ✦Never iron a photo: heat melts the emulsion
- ✦Never use a hair dryer or steam
- ✦Safe method: heavy books overnight, then scan for AI repair
How Our App Fixes It
Flatten, scan, upload. Crease gone in 30 seconds.
Flatten overnight, scan at 600 DPI, upload to restorephotosapp.com and select "Repair." In 30 seconds the creases are gone. For wallet photos that are also faded, run "Restore Old Photo" as a second step.
- ✦AI generates matching image content through each crease
- ✦Handles face creases, center folds, and multiple lines
- ✦2 free repairs per account, no credit card required
- ✦Family plan: 150 photos for $19.99
In-depth guide
How to fix creased photos: step by step
Step one: flatten the photo safely. Place it between two sheets of clean white paper (to prevent sticking) and stack three or four heavy hardcover books on top. Leave it for at least 12 hours, overnight is best. The photo will flatten enough to scan. Do NOT use an iron (melts the emulsion), a hair dryer (warps the paper), or steam (curls and swells the paper base). Mechanical pressure from books is the only safe method.
Step two: scan at 600 DPI minimum. Creases are thin lines. At 300 DPI, a crease in a wallet-size photo is only a pixel or two wide and the AI cannot tell it apart from image detail. At 600 DPI, the crease is clearly visible and the AI can separate it from the image. For wallet-size prints (2x3 inches), use 1200 DPI because the photo is so small that every pixel matters.
Step three: upload to restorephotosapp.com and select "Repair." The AI removes the crease lines in about 30 seconds. For a single center crease, one pass is usually perfect. For wallet photos with multiple parallel creases from years of folding, a second pass refines any residual lines.
Step four (usually needed for wallet photos): the photo is probably also faded and yellowed from years of being carried. After the crease repair, download the result and upload it again. This time select "Restore Old Photo" to fix the color and contrast. The two-step flow (repair first, restore second) gives better results than trying to fix everything in one pass because each step is focused on a different type of damage.
Step five: print a new copy. The whole point of fixing a creased wallet photo is usually to preserve it properly. Order a print from a real photo lab on archival paper. Frame it, give it as a gift, or simply store it flat and safe. Keep the digital file backed up in two locations.
Expert tips
Tips for fixing creased photos
Flatten overnight, not with heat
Heavy books on top of the photo for 12 hours flatten it safely. Never use an iron, hair dryer, or any heat source because the emulsion will melt, bubble, or stick to the paper above it.
Scan at 600+ DPI for crease repairs
Crease lines are thin. At 300 DPI the AI may not distinguish the crease from image detail. At 600 DPI it clearly sees the line and removes it cleanly.
Repair creases before fixing color
For photos that are both creased and faded, run "Repair" first for the creases, then "Restore Old Photo" for the fading. The crease repair works better when the AI can see full color information.
Check for multiple creases
Photos folded repeatedly (wallet photos, mailed photos) often have two or three parallel creases. Make sure the AI caught all of them. If a faint crease remains, a second repair pass will get it.
Pricing
One-time pricing. No subscription. Credits never expire.
One-time payment
Starter
$0.50 / credit
= restore 10 photos
Perfect for trying it out on a few precious photos.
- High-Resolution Output
- Credits Never Expire
- Free Digital Frames
- 30-Day Money-Back Guarantee
100% Money-Back Guarantee
One-time payment
Pro
$0.50 / credit
= restore 30 photos
For restoring a small album of memories.
- High-Resolution 1080P Output
- Credits Never Expire
- Free Digital Frames
- 30-Day Money-Back Guarantee
100% Money-Back Guarantee
One-time payment
Family
$0.13 / credit
= restore 150 photos
Save 74% per credit
Restore your entire family photo collection.
- High-Resolution 1080P Output
- Credits Never Expire
- Free Digital Frames
- 30-Day Money-Back Guarantee
100% Money-Back Guarantee
One-time payment
Studio
$0.11 / credit
= restore 450 photos
Save 78% per credit
For entire archives, professionals, and power users.
- High-Resolution 1080P Output
- Credits Never Expire
- Free Digital Frames
- Priority Support
- 30-Day Money-Back Guarantee
100% Money-Back Guarantee
Prices don't include VAT.
FAQ
Frequently asked questions
Can I iron a creased photo to flatten it?
No. An iron melts the emulsion (the image layer) even on the lowest setting. The photo will stick to the surface and the image will be destroyed. Use heavy books overnight to flatten the paper safely, then scan and let AI remove the crease line digitally.
Can AI remove a crease that runs through someone's face?
Yes. This is the most common case. The AI reads skin tone, texture, and lighting on both sides of the crease and generates matching content through the gap. Even creases through eyes, noses, and mouths disappear convincingly.
My wallet photo has been folded for 20 years. Can it be fixed?
Yes. Wallet photos are our most common crease repair. Flatten it between heavy books overnight, scan at 600+ DPI, and upload. The AI removes the center fold and any additional creases from years of carrying. Most people also run a second pass to fix the fading and yellowing that wallet photos accumulate.
Can I use a hair dryer to flatten a creased photo?
No. Heat warps the paper base and can crack or bubble the emulsion. The only safe flattening method is overnight pressure from heavy books. The crease in the paper will remain, but the photo will be flat enough to scan. AI then removes the crease line digitally.
Will the crease line still be visible after repair?
For most creases, no. The AI generates matching image content through the crease so the repair is invisible on screen and in prints. For very deep creases with heavy emulsion damage on both edges, a second pass cleans up any residual line.
Is crease repair different from scratch repair?
Similar AI technology, but creases are harder. Scratches sit on the surface. Creases go deeper into the paper base. The AI handles both, but creases require more reconstruction. For scratch removal, see restorephotosapp.com/remove-scratches-from-photos.
My photo was mailed in an envelope and arrived creased. Can it be fixed?
Yes. Mailing creases are usually one or two clean fold lines from postal sorting. These produce excellent AI repairs because the crease is straight and the image on both sides is intact.
How do I fix a wallet photo that is creased AND faded?
Two steps: first run "Repair" to remove the creases, then run "Restore Old Photo" to fix fading. See restorephotosapp.com/fix-faded-photos for fading tips. If the photo is also yellow, see restorephotosapp.com/fix-yellow-photos. Wallet photos almost always need both steps.
Is it free to try?
Yes. 2 free repairs per account. No credit card needed.


