Why remove grain from photos with AI?
Every digital camera and smartphone produces grain when light is limited. The sensor compensates by amplifying the signal, which amplifies random electrical noise along with it. The result is that characteristic grainy, speckled look that makes photos feel low-quality. Film photographs have a similar issue: higher-speed film stocks have larger silver halide crystals that produce visible grain. AI noise reduction solves both problems after the fact. It is the digital equivalent of having shot at a lower ISO with a better lens and more light. For photographers who shoot events, weddings, wildlife at dusk, or any fast-moving subject in imperfect light, AI denoising rescues shots that would otherwise be unusable. For anyone scanning old film negatives or prints, it removes the grain that was baked into the original medium. Over 470,000 users trust our tool for photo enhancement, and grain removal is one of the most requested features.
- Fix grainy high-ISO photos from concerts, events, and indoor parties
- Clean up film grain from scanned negatives, slides, and old prints
- Rescue smartphone night-mode photos with heavy noise artifacts
- Remove scanner noise introduced during digitization of old photographs
- Produce clean, print-ready images from photos shot in challenging light
What to expect
What imaging professionals say about AI denoising
Professional photographers have long considered noise reduction a necessary compromise: reduce grain and you lose sharpness. The best manual denoising in Lightroom or Capture One requires careful balancing of luminance smoothing against detail preservation, and the result is always a trade-off. AI denoising changes this equation. Because the model was trained on millions of paired examples | the same scene shot clean and with added noise | it learned to predict the clean image directly, without the blur penalty of traditional algorithms.
For wedding and event photographers, AI denoising is a workflow revolution. Reception venues, churches, and dance floors are notoriously low-light environments where ISO 3200-12800 is unavoidable. In the past, these shots required 5-10 minutes each of careful manual noise reduction in post. AI denoising processes them in 30 seconds with results that match or exceed manual work. Many professionals now shoot at higher ISOs deliberately, knowing that AI cleanup will produce a clean file.
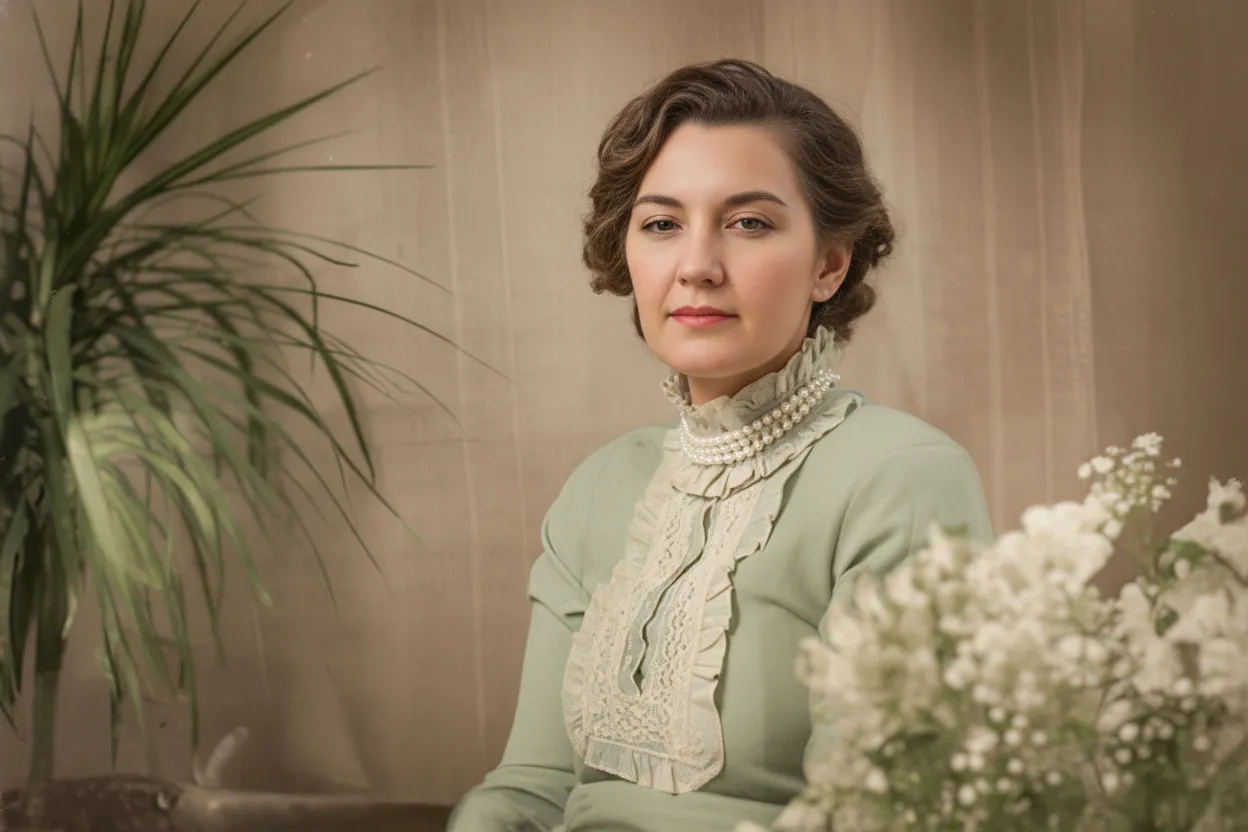
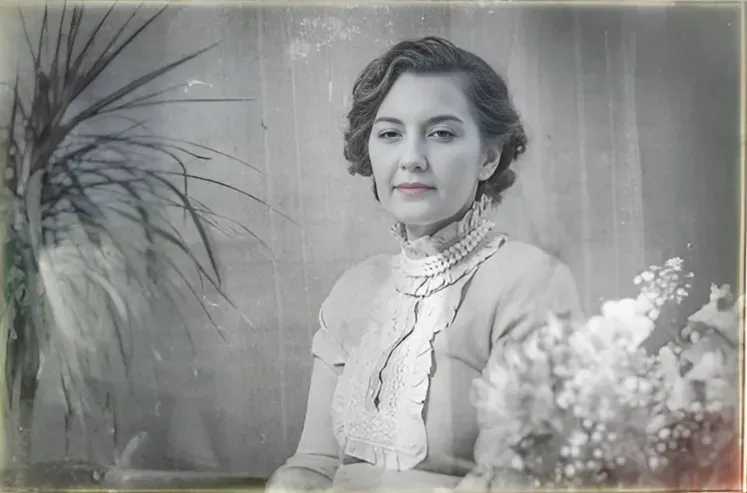
Film photographers and archivists benefit equally. Medium-format and large-format film is relatively grain-free, but 35mm and especially 35mm pushed (underexposed and overdeveloped) shows pronounced grain. Scanning amplifies this further. AI denoising removes the grain while preserving the organic tonal quality that film shooters prize. The result looks like the image the photographer intended | the subject, not the medium.
One caution: artistic grain is sometimes intentional. Street photographers, documentary shooters, and fine-art black-and-white photographers sometimes prefer visible grain for its textural quality. In these cases, removing grain changes the aesthetic intent of the image. AI denoising is best applied to photos where grain is unwanted | technically limited shots that would look better clean. For intentionally grainy work, preserve the original.
“My grandma cried when she saw her wedding photo restored. Absolutely incredible.”
Maria K.
“Uploaded a blurry photo from the 70s and got back a crystal clear image. Like magic.”
James T.
“Finally recovered old family photos I thought were lost forever. So easy to use.”
Sarah M.
How it works
3 simple steps.
Smart Denoising
AI separates grain from real detail.
Traditional noise reduction works by blurring the image slightly, which removes grain but also destroys fine detail like hair strands, fabric texture, and skin pores. Our AI takes a different approach. It was trained on millions of noisy/clean image pairs and learned to distinguish genuine image detail from random noise at every frequency. The model removes the grain pattern while leaving | and even enhancing | the real texture underneath. The result is a photo that looks like it was shot at ISO 100 in perfect light, regardless of the actual shooting conditions.
- ✦Trained on millions of noisy/clean image pairs for accurate grain separation
- ✦Preserves hair, skin texture, fabric weave, and fine edges during denoising
- ✦Handles luminance noise (grainy speckles) and chroma noise (colored blotches)
- ✦Works on high-ISO digital noise, film grain, and scanner noise equally well
Low-Light Rescue
Save photos shot in bad lighting.
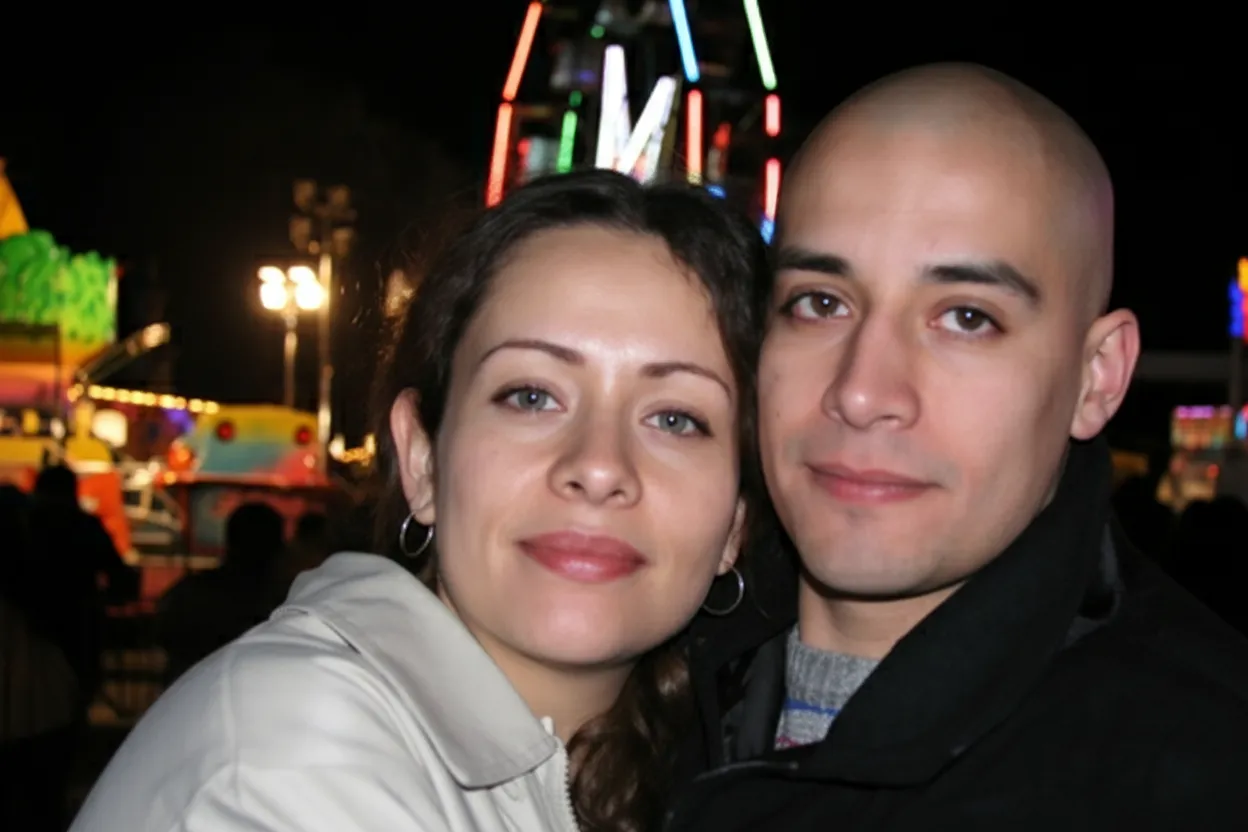
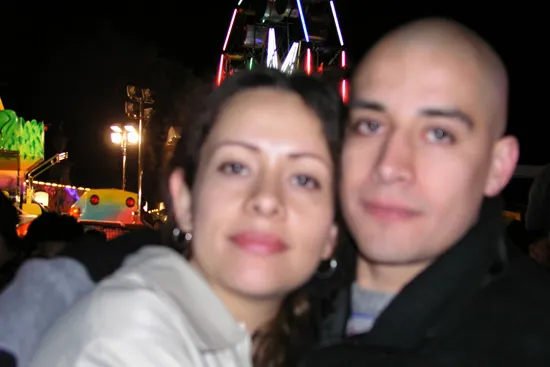
Concert photos, indoor birthday parties, dimly lit restaurants, evening street scenes | these are the moments worth capturing, but cameras struggle with them. When there is not enough light the sensor compensates with higher ISO, which introduces visible grain across the entire image. Faces become speckled, backgrounds turn into a noisy mess, and fine details disappear. Our AI reads the scene, identifies what is signal and what is noise, and reconstructs the clean image that your camera could not capture. Dark areas that were buried in grain become smooth and detailed.
- ✦Rescues concert, event, and nightlife photos shot at high ISO
- ✦Cleans noisy shadows and dark backgrounds without losing depth
- ✦Recovers facial detail lost to heavy grain in indoor group shots
- ✦Fixes the colored speckle pattern common in smartphone night mode
Zero Learning Curve
No sliders. No manual adjustments. Just upload.
Lightroom and DxO PureRAW offer granular noise reduction controls, but they demand you understand luminance sliders, color noise separation, detail preservation thresholds, and masking. Our AI handles all of this automatically. It detects the type and intensity of noise in your specific photo and applies the optimal denoising strength. There is nothing to configure. Every new account gets 2 free denoising passes so you can see the quality before spending a cent.
- ✦Fully automatic | no noise reduction sliders to learn
- ✦Adapts denoising strength to each photo individually
- ✦Works in any browser on desktop, tablet, or phone
- ✦2 free passes on every new account, no credit card required

In-depth guide
The complete guide to removing grain and noise from photos
Photo grain (also called noise) comes in two varieties: luminance noise and chroma noise. Luminance noise appears as random light-and-dark speckles, like static on an old television. It is most visible in mid-tones and shadows. Chroma noise appears as random colored blotches | typically pink, green, and blue speckles that are not part of the actual scene. Most grainy photos have both types, and the AI handles each separately. Understanding the difference helps you evaluate results: after denoising, the speckles should be gone and the colored blotches eliminated, while real texture remains.
The most common cause of grain is high ISO. Every camera sensor has a base sensitivity (usually ISO 100 or 200) where noise is minimal. As you increase ISO to shoot in dimmer light, the sensor amplifies the signal, and electrical noise is amplified along with it. ISO 800 is where grain typically becomes visible. ISO 3200 and above produces heavy grain on most cameras. Smartphone sensors, being physically smaller, produce visible noise at even lower ISOs. If you shot at high ISO because the light demanded it, AI denoising is the way to recover a clean image after the fact.
Film grain is structurally different from digital noise but responds equally well to AI denoising. Film grain comes from the random distribution of silver halide crystals in the emulsion. Higher-speed films (ISO 400, 800, 1600, 3200) have larger crystals and more visible grain. When you scan film, the scanner also adds its own noise layer on top of the film grain. The AI model recognizes both sources and removes them together. If you are digitizing a film archive, running every scan through AI denoising before archiving produces cleaner files for the future.
For digital photos, always start with the original RAW or highest-quality JPEG. Compressed images | social media downloads, messaging app photos, screenshots of photos | have already lost detail to compression. The AI can still remove grain from compressed images, but the result will not be as sharp as denoising the original file. If you have the RAW file, export it at full resolution without applying any noise reduction in your RAW converter, then upload to our tool. Let the AI do all the denoising in one pass rather than layering multiple processing stages.
Batch denoising is practical for large shoots. Wedding photographers routinely deliver 300-500 images per event, and in a dimly lit venue, most of those need noise reduction. Processing them one at a time in Lightroom takes an entire day. Uploading the batch to our AI denoiser processes each image independently with optimal settings and delivers results in minutes. At $0.13 per photo on the Family plan ($19.99 for 150 credits), batch denoising costs less than the time it would take to do manually.
After denoising, consider whether the photo needs additional enhancement. Grainy photos are often also slightly underexposed (that is why ISO was raised in the first place). A second pass with our enhance tool can lift the exposure, boost color accuracy, and sharpen details that were hidden under the grain. The recommended workflow is: denoise first, then enhance. Denoising on a clean signal produces the best result, and enhancement on a grain-free image works better because it is not amplifying noise alongside the image.
Keep your denoised files organized. Create a folder structure that separates originals from denoised versions | for example, "Event-Originals" and "Event-Denoised." Never overwrite your originals. AI denoising removes information from the image (the grain), and while that removal is almost always an improvement, there may be cases where you want to revisit the original | for instance, if a future AI model produces even better results. Store both versions in cloud backup and a local drive for maximum safety.
For photographers who want to reduce grain at the source: shoot at the lowest ISO your scene allows, use a wider aperture or slower shutter speed if subject motion permits, and use a tripod for static scenes. Image stabilization helps with camera shake but does not reduce noise. If you must shoot at high ISO | and you often must for action, events, and wildlife | shoot confidently knowing that AI denoising will clean up the result in post. The days of avoiding high ISO out of fear of grain are over.
Expert tips
Tips for the best AI grain removal results
Upload the original file, not a compressed copy
Social media and messaging apps compress photos heavily, destroying detail the AI needs. Always upload the original JPEG or RAW export. The difference in denoising quality between an original and a compressed copy is significant.
Skip noise reduction in your RAW converter
If you shoot RAW, export without applying Lightroom or Camera Raw noise reduction. Let the AI handle all denoising in one pass. Layering two noise reduction tools degrades detail more than a single, well-trained AI pass.
Denoise before other edits
Apply AI denoising as the first step in your workflow. Sharpening, contrast, and color edits all amplify grain. Removing the grain first means every subsequent edit works on a clean image and produces a better final result.
Check shadows at 100% zoom
Grain is most visible in shadow and mid-tone regions. After denoising, zoom to full resolution and inspect the dark areas carefully. They should be smooth and detailed, not blotchy or waxy. Our AI preserves shadow detail rather than smearing it.
Use the enhance tool after denoising
Grainy photos are usually underexposed too. After removing the grain, run the photo through our enhance tool to lift exposure, correct white balance, and sharpen detail. The two-step process produces dramatically better results than either step alone.
Batch denoise event and wedding shoots
If you have dozens or hundreds of grainy photos from the same event, upload them as a batch. The AI processes each image individually with tailored settings. At $0.13 per photo on the Family plan, it costs a fraction of what manual editing would.
Do not pre-sharpen grainy photos
Sharpening a grainy photo makes the grain sharper too, and the AI then has to work harder to distinguish grain from detail. Upload the unsharpened original and let the AI denoise first, then sharpen the clean result if needed.
For film scans, remove dust spots before denoising
Physical dust on the scanner or film produces sharp white or dark spots that are different from grain. Clone or spot-heal these in any editor first, then upload for AI denoising. This prevents the AI from misinterpreting dust as image detail.
Pricing
One-time pricing. No subscription. Credits never expire.
One-time payment
Starter
$0.50 / credit
Perfect for trying it out on a few precious photos.
- 10 Credits Included
- Restore 10 Photos
- High-Resolution Output
- Credits Never Expire
- Free Digital Frames
- 30-Day Money-Back Guarantee
100% Money-Back Guarantee
One-time payment
Pro
$0.50 / credit
For restoring a small album of memories.
- 30 Credits Included
- Restore 30 Photos
- High-Resolution 1080P Output
- Credits Never Expire
- Free Digital Frames
- 30-Day Money-Back Guarantee
100% Money-Back Guarantee
One-time payment
Family
$0.13 / credit
Save 74% per credit
Restore your entire family photo collection.
- 150 Credits Included
- Restore 150 Photos
- High-Resolution 1080P Output
- Credits Never Expire
- Free Digital Frames
- 30-Day Money-Back Guarantee
100% Money-Back Guarantee
One-time payment
Studio
$0.11 / credit
Save 78% per credit
For entire archives, professionals, and power users.
- 450 Credits Included
- Restore 450 Photos
- High-Resolution 1080P Output
- Credits Never Expire
- Free Digital Frames
- Priority Support
- 30-Day Money-Back Guarantee
100% Money-Back Guarantee
Prices don't include VAT.
FAQ
Frequently asked questions
What causes grain in photos?
Grain (noise) is caused by high ISO settings in digital cameras, where the sensor amplifies light signals along with random electrical noise. In film photography, grain comes from the physical silver halide crystals in the emulsion. Smaller sensors, like those in smartphones, produce grain at lower ISOs. Low light, fast shutter speeds, and high-speed film stock all increase the amount of visible grain.
Can AI really remove grain without losing detail?
Yes. Traditional noise reduction blurs the entire image to smooth out grain, losing real detail in the process. AI denoising is fundamentally different. The model was trained on millions of noisy/clean image pairs, so it learned to distinguish genuine texture from random noise. It removes the grain pattern while preserving | and even enhancing | real detail like hair, skin pores, fabric weave, and text.
Is grain removal free?
Every new account gets 2 free grain removals with no credit card required. After that, credit packs start at $4.99 (Starter, 10 credits). The Family plan at $19.99 gives you 150 credits at just $0.13 per photo, with a 30-day money-back guarantee.
Can I remove grain from old film photos?
Yes. Film grain responds very well to AI denoising. The model recognizes the random crystal pattern characteristic of film and removes it while preserving the organic tonal quality. This works on scanned negatives, slides, and prints. Many archivists and film enthusiasts use our tool to clean up entire film collections.
How is AI denoising different from Lightroom noise reduction?
Lightroom noise reduction uses mathematical algorithms (bilateral filtering, wavelet thresholding) that smooth the image to reduce grain. You control the strength with sliders, and there is always a trade-off between noise reduction and detail loss. AI denoising uses a neural network trained on real noisy/clean image pairs. It predicts what the clean image should look like, producing sharper results with less detail loss and no manual slider adjustments.
Will removing grain change the colors in my photo?
The AI removes chroma noise (colored speckles) which actually makes colors more accurate, not less. Random pink, green, and blue blotches are replaced with the true underlying color. Skin tones, sky gradients, and fabric colors all look more natural after denoising.
Can I remove grain from a smartphone photo?
Absolutely. Smartphone photos are one of the most common inputs. Phone sensors are small and produce visible noise in any indoor or low-light setting. Night mode reduces some noise but often introduces its own artifacts. AI denoising cleans up both standard and night-mode smartphone photos effectively.
How long does AI grain removal take?
About 30 seconds per photo. Upload your grainy image, the AI analyzes and removes the noise pattern, and you see the clean before/after comparison almost immediately. Download the full-resolution result with one click.
Should I denoise before or after editing my photo?
Before. Always denoise first. Sharpening, contrast adjustments, and color grading all amplify grain. If you edit first and denoise second, the AI has to work with amplified noise and the result will be worse. Denoise the original, then apply all your other edits to the clean file.
Can I remove grain from concert and event photos?
Yes. Concert and event photos are shot at very high ISOs (3200-12800 or higher) and are among the grainiest images people take. The AI handles heavy grain well because the noise pattern is predictable at high ISOs. Expect dramatic improvements | grainy, speckled faces become clean and recognizable.
Does grain removal work on video screenshots?
Yes, but with caveats. Video frames are lower resolution and more compressed than photos, so there is less detail to preserve. The AI still removes the grain effectively, but the final image will reflect the limitations of the original video quality. For best results, extract the frame at the highest resolution the video supports.
Can I batch process multiple grainy photos at once?
Yes. Upload a batch and the AI processes each image individually with optimal denoising settings. This is especially useful for event photographers with dozens or hundreds of high-ISO shots from the same venue. Each photo gets tailored processing, not one-size-fits-all smoothing.
Is my photo private when I upload it?
Yes. All uploads are encrypted via HTTPS and stored privately on secure cloud infrastructure. Your photos are kept for 30 days so you can re-download results, then permanently deleted. We never share your images with third parties or use them for AI training.
What file formats are supported for grain removal?
The tool accepts JPEG, PNG, and WebP files. The output is a high-quality JPEG at the full resolution of your original. For most use cases JPEG offers the best quality-to-size ratio. If you need lossless PNG output, contact support about Studio plan options.
Can I remove grain from a photo that has already been edited?
You can, but results are best on unedited originals. If the photo has already been sharpened, the grain will be sharper too and harder to separate from detail. If the photo has been heavily compressed, detail may have already been lost. Whenever possible, upload the original unedited file for the cleanest denoising result.


