Why does this comparison matter?
Search for "how to restore old photos" and you will find two kinds of results. Half are Photoshop tutorials with 30 steps and 40-minute YouTube videos. The other half are AI tools promising one-click results. Both camps present their method as the obvious choice and ignore the other. The truth is more nuanced. Each approach handles certain types of damage better than the other, and knowing the difference before you start saves you from wasting time on the wrong method.
- Most Photoshop tutorials assume you already know layers, masks, and blend modes
- AI works well for the damage most family photos actually have: fading and scratches
- Photoshop is still the right tool when parts of a photo are physically missing
- A hybrid workflow often gives better results than either method alone
- Per-photo AI pricing makes more sense than a monthly subscription for most people
- Knowing the strengths of each tool prevents hours of unnecessary manual editing
What to expect
Where each method actually wins (damage by damage)
Fading and color casts are the most common problem in old photos. The dyes in color prints break down over time, leaving everything washed out or shifted toward orange-yellow. AI corrects this extremely well because it has seen millions of examples of exactly this type of degradation. In Photoshop, you would adjust Curves channel by channel, tweak Hue/Saturation, and maybe add a Color Balance layer. A competent editor gets similar results, but it takes 10 to 15 minutes of careful adjustment. AI does it instantly and usually nails the color on the first try.
Scratches, dust, and small blemishes go to AI when they are scattered across the photo. The neural network identifies and removes dozens of scratches simultaneously. In Photoshop, you heal each scratch individually with the Healing Brush, which is fine for five scratches but tedious for fifty. However, if there is one specific deep scratch running across someone's face and you want surgical precision in how it is repaired, the Healing Brush in Photoshop gives you that control.
Torn, ripped, or missing sections are where Photoshop has no competition yet. AI cannot reliably generate new image content that matches the rest of the photo. If half of grandma's face is torn away, a skilled Photoshop retoucher can reconstruct it using the symmetry of the other half, reference photos, and the Clone Stamp. This kind of creative reconstruction is something only a human can do well right now.
Blurry faces are surprisingly where AI pulls ahead of even skilled Photoshop users. AI face restoration models can recover detail (sharpness in eyes, skin texture, hair strands) that simply does not exist in the blurry original. Photoshop sharpening tools (Unsharp Mask, Smart Sharpen) can only enhance detail that is already there. They cannot invent new detail the way a trained neural network can.
One more practical note on cost. Photoshop runs about $23 per month. If you need it for other work (graphic design, photography editing), that is fine. But if you only need it for restoring a dozen family photos, paying for months of subscription while you learn the software is hard to justify when AI tools charge a few dollars for the same job.
“My grandma cried when she saw her wedding photo restored. Absolutely incredible.”
Maria K.
“Uploaded a blurry photo from the 70s and got back a crystal clear image. Like magic.”
James T.
“Finally recovered old family photos I thought were lost forever. So easy to use.”
Sarah M.
How it works
3 simple steps.
The AI approach
Upload, wait, download. That is the whole process.
AI restoration works like a black box. A neural network trained on millions of damaged and repaired photo pairs looks at your image, figures out what is damage and what is original content, and outputs a clean version. You never touch a single slider. The strength of this approach is accessibility: anyone with a phone or laptop can get professional-looking results without learning any software.
- ✦No layers, no masks, no adjustment curves to learn
- ✦Handles fading, scratches, yellowing, and blur in one pass
- ✦Identical results whether you are a beginner or an expert
- ✦Works in a browser on any device, including your phone
The Photoshop approach
Total creative control, but at a steep learning curve
Photoshop gives you access to every pixel in the image. The Healing Brush lets you paint over scratches by sampling nearby texture. The Clone Stamp copies one area onto another. Curves and Levels let you remap the tonal range precisely. Content-Aware Fill can generate plausible content to replace missing sections. These tools are incredibly powerful in skilled hands, but the learning curve is real: most people need months of practice before they can restore photos confidently.
- ✦Surgical precision on individual scratches and blemishes
- ✦Can reconstruct torn-off corners, missing faces, and ripped sections
- ✦Full control over color grading, contrast, and selective adjustments
- ✦Requires intermediate to advanced editing skills to use effectively
The hybrid approach
Use AI for the heavy lifting, Photoshop for the details
Professional retouchers increasingly use both tools. They run the photo through AI first to clear up the broad damage: fading, color cast, scattered scratches, soft faces. Then they open the result in Photoshop to fix the things the AI missed or got wrong. Maybe the AI blurred a detail in the background, or left a faint scratch near the edge. Those targeted fixes take minutes instead of the hours it would take to do everything from scratch.
- ✦AI clears 80 to 90 percent of typical damage in one pass
- ✦Photoshop cleans up the remaining problem areas
- ✦Cuts total editing time from hours to minutes
- ✦Produces better results than either tool used alone
In-depth guide
A practical walkthrough: the same photo, two methods
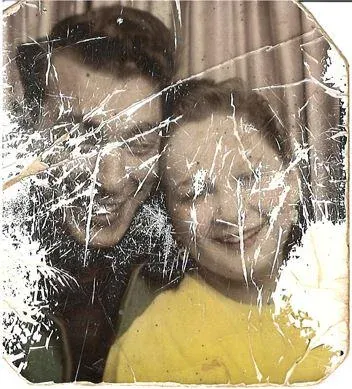
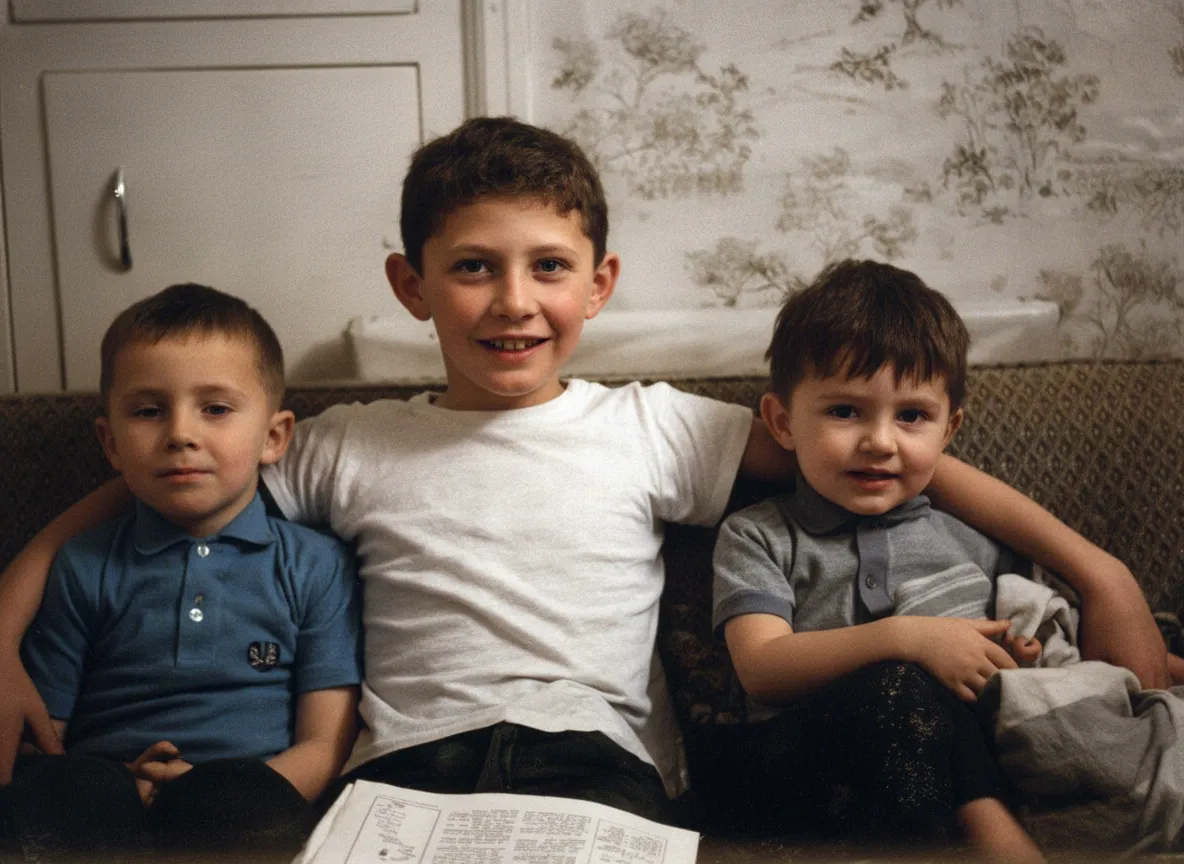
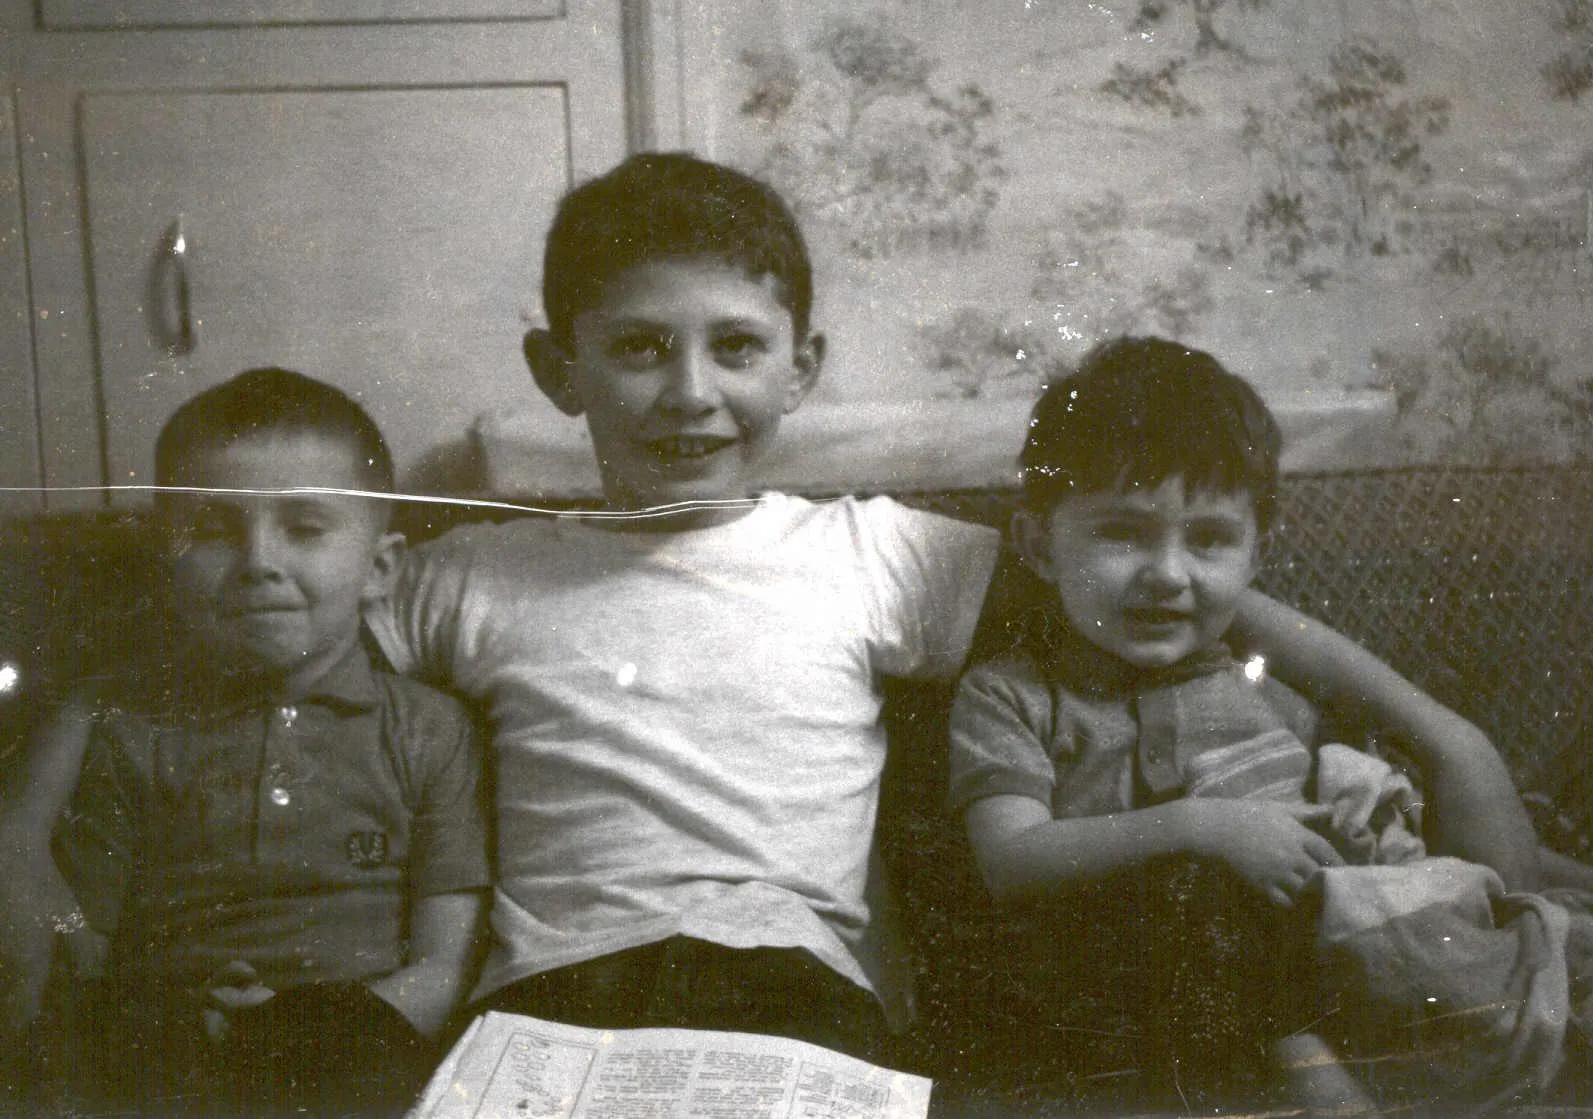
To make this comparison concrete, let us take a real-world scenario. You have a color family photo from 1985. It has faded to a reddish-orange tone, there are a dozen fine scratches across the surface, and the faces look slightly soft. This is the most common type of old photo damage, and it is a fair test for both methods.
The Photoshop workflow starts with duplicating the background layer (non-destructive editing habit). You open Curves and pull down the Red channel to counteract the orange cast, then bump up contrast in the composite channel. The color still looks off, so you add a Hue/Saturation adjustment layer and desaturate the reds slightly. Next you zoom in to 200 percent and pick up the Healing Brush. You set the sample point near each scratch and paint over them one at a time. There are twelve scratches, so this takes a while. For the faces, you duplicate the layer, run Unsharp Mask at maybe 120 percent / 1.5 pixels / 0 threshold, then add a black layer mask and paint white over just the faces. You flatten, export as JPEG. Total time for someone comfortable with Photoshop: roughly 30 to 45 minutes.
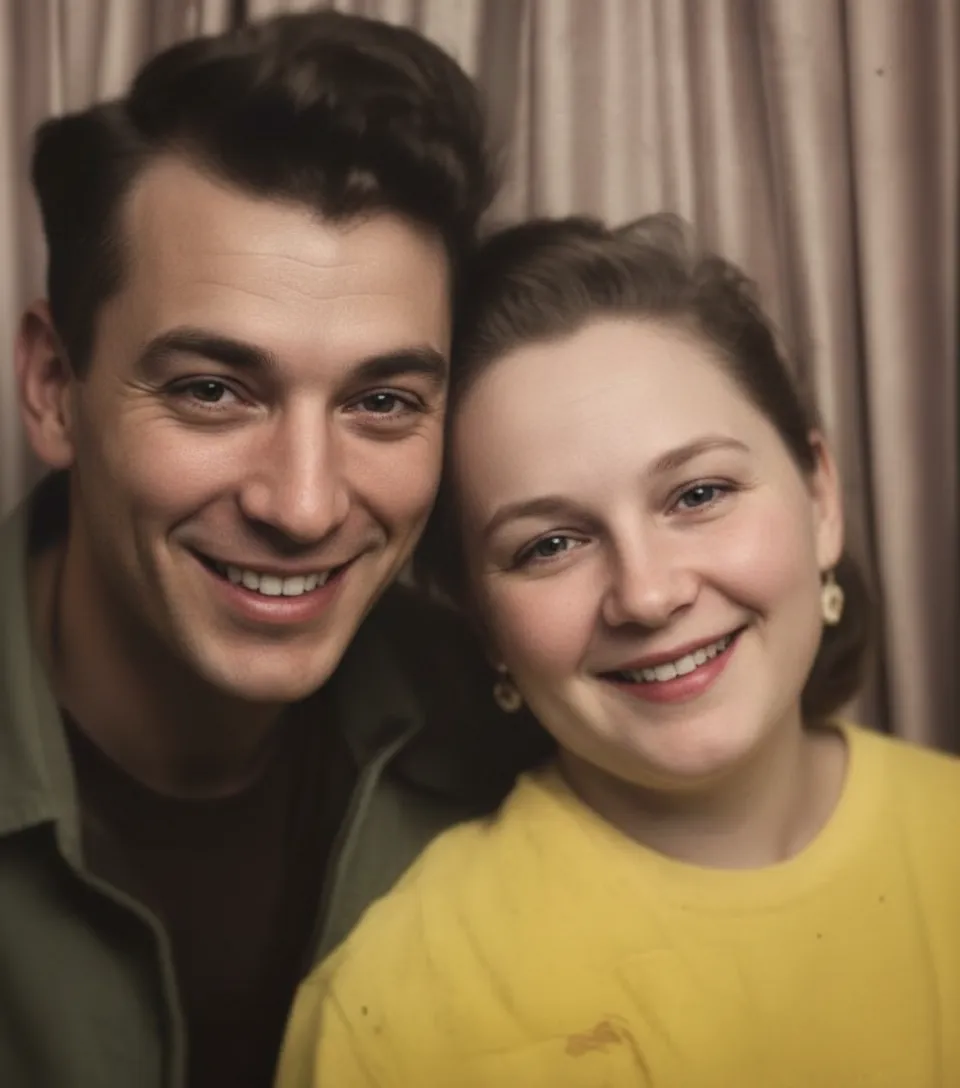
The AI workflow: you open a browser, drag the photo onto the upload area, wait while the model processes, and download the result. The orange cast is gone. The scratches are gone. The faces are noticeably sharper. If you put the Photoshop result and the AI result side by side, most people could not tell which is which. That is the reality for this type of damage.
Now a harder scenario. Same era, but this photo was stored in a damp basement. It has water stains across the lower third, the corners are curled and cracked, and a two-centimeter piece is torn off the upper right. AI handles the water stains well and cleans up the cracked areas, but it leaves the torn corner as-is because there is no image data to work with. A Photoshop user can select the torn area, run Content-Aware Fill (which generates plausible background based on surrounding pixels), and clone-stamp in finer details. The result is not perfect, but it is much better than the blank space AI leaves behind.
This is the pattern that repeats across dozens of real restoration jobs. When the damage is within the image (color shift, scratches, fading, blur), AI matches manual editing. When the damage removes part of the image (tears, missing corners, burned edges), you need a human with Photoshop.
Black-and-white colorization deserves its own section because the gap between the two methods is enormous here. In Photoshop, hand-coloring a black-and-white photo is one of the most tedious tasks in image editing. You create a new layer set to "Color" blend mode, pick a skin tone, and carefully paint over every face. Then a different shade for the hair. Another for the clothing. Another for the sky. Every area needs its own color selection, and if your brush slips outside the edges, you have to go back and fix it. A detailed photo with several people and a complex background can take three to four hours.
AI colorization produces comparable results in a single pass. The model has learned what colors typically go with skin, grass, sky, wood, fabric, and dozens of other materials. It is not always perfect. Sometimes it picks the wrong color for a piece of clothing or makes grass slightly too vivid. But those small issues are easy to fix in Photoshop after the fact. Starting from the AI colorized version and adjusting a few colors takes 10 minutes instead of four hours from scratch.
The question most people actually have is not "which is technically better" but "which should I use for my situation." Here is a simple decision framework. If you found a shoebox of old prints at your parents' house and want to digitize and clean them up, AI is the right starting point. Most of those photos will have standard age-related damage that AI handles perfectly. Run them all through AI first. Then look at the results. Maybe two or three photos have damage the AI could not fully fix. Those are the ones worth opening in Photoshop.
If you are a professional photographer or retoucher, you probably already own Photoshop and know how to use it. In that case, AI is a time-saving tool in your existing workflow, not a replacement. Run the initial restoration through AI to handle the broad strokes, then open the result in Photoshop for the fine-tuning you are used to doing. This hybrid approach cuts your per-photo time roughly in half.
What about Photoshop's own AI features? Adobe added Neural Filters in recent versions, including a "Photo Restoration" filter that removes scratches and repairs damage automatically. It brings AI into the Photoshop interface, which is convenient if you already use the software. In practice, dedicated AI restoration tools tend to produce more consistent results because they are optimized specifically for this task, while Neural Filters are a general-purpose addition to a general-purpose editor. Still, if you already pay for Photoshop, the Neural Filters are worth trying before adding another tool to your workflow.
Other AI alternatives worth knowing about: Remini specializes in face enhancement and works well for portraits. MyHeritage offers photo enhancement within their genealogy platform. Google Photos has basic auto-enhance features. The landscape changes quickly, but the general principle stays the same: AI is increasingly good at automated correction of common damage, while manual tools remain necessary for creative reconstruction.
One last angle that rarely gets discussed: future-proofing. If you scan your old photos at 600 DPI today and save the original scans, you can always re-run them through improved AI models later. AI restoration quality improves with each model generation. A photo you restore today with AI might look even better if you re-process the original scan a year from now. This is another argument for keeping your original high-resolution scans separate from any restored versions.
For photos that are too damaged for either method to fully fix on its own, professional restoration services are still an option. A skilled human retoucher with Photoshop (and increasingly, AI tools as part of their workflow) can handle extreme damage that neither tool manages alone. Expect to pay $25 to $150 per photo depending on the complexity. For the one photo that truly matters, like your grandparents' only wedding portrait, that investment may be worthwhile.
Expert tips
Practical tips from experience
Scan at 600 DPI no matter which method you choose
Both AI and Photoshop produce better results with more image data. A phone photo works in a pinch, but a 600 DPI flatbed scan gives you noticeably sharper restorations and more room to crop or enlarge later.
Keep the original scan in a separate folder
Never edit or overwrite your raw scan. Save it in a "Originals" folder and work from copies. AI models improve every year, and you may want to re-process that same scan for better results in the future.
Run AI first even if you plan to use Photoshop
The AI pass removes the tedious bulk work (fading, scattered scratches, color correction). Opening the already-cleaned result in Photoshop lets you focus only on the details that need human attention.
For colorization, AI is the clear starting point
Hand-painting color in Photoshop is one of the most time-consuming tasks in photo editing. AI colorization gives you a solid base in seconds. Adjust any colors you disagree with in Photoshop afterward.
Look at the photo at 100 percent zoom before deciding
Some damage is hard to see at thumbnail size. Zoom in to check for fine scratches, subtle blur, and color shifts. A photo that looks "fine" at a glance might reveal serious damage up close.
For torn photos, align the pieces before scanning
If a photo is torn into pieces, carefully place them together on the scanner bed with minimal gaps. Photoshop Content-Aware Fill works much better when the pieces are already close together.
Try Photoshop Neural Filters if you already subscribe
Adobe's built-in Photo Restoration neural filter is worth testing before doing manual work. It is not as consistent as dedicated AI tools, but it runs right inside Photoshop and saves you the step of exporting and re-importing.
Do not oversharpen faces in Photoshop
A common Photoshop mistake is cranking Unsharp Mask too high on faces, creating halos and unnatural textures. AI face sharpening avoids this because the model knows what realistic facial detail looks like.
Pricing
One-time pricing. No subscription. Credits never expire.
One-time payment
Starter
$0.50 / credit
Perfect for trying it out on a few precious photos.
- 10 Credits Included
- Restore 10 Photos
- High-Resolution Output
- Credits Never Expire
- Free Digital Frames
- 30-Day Money-Back Guarantee
100% Money-Back Guarantee
One-time payment
Pro
$0.50 / credit
For restoring a small album of memories.
- 30 Credits Included
- Restore 30 Photos
- High-Resolution 1080P Output
- Credits Never Expire
- Free Digital Frames
- 30-Day Money-Back Guarantee
100% Money-Back Guarantee
One-time payment
Family
$0.13 / credit
Save 74% per credit
Restore your entire family photo collection.
- 150 Credits Included
- Restore 150 Photos
- High-Resolution 1080P Output
- Credits Never Expire
- Free Digital Frames
- 30-Day Money-Back Guarantee
100% Money-Back Guarantee
One-time payment
Studio
$0.11 / credit
Save 78% per credit
For entire archives, professionals, and power users.
- 450 Credits Included
- Restore 450 Photos
- High-Resolution 1080P Output
- Credits Never Expire
- Free Digital Frames
- Priority Support
- 30-Day Money-Back Guarantee
100% Money-Back Guarantee
Prices don't include VAT.
FAQ
Frequently asked questions
Is AI photo restoration as good as Photoshop?
It depends on the damage. For fading, scratches, yellowing, and blur (the most common issues in old photos), AI consistently matches skilled Photoshop work. For torn photos with missing sections, or situations where you need to reconstruct part of an image, Photoshop is still ahead.
How long does each method take per photo?
AI processes a photo in under a minute. Photoshop takes 30 minutes to 2 hours depending on the damage severity and the editor's skill level. The difference becomes dramatic at scale: 20 photos take about 10 minutes with AI versus an entire weekend with Photoshop.
Do I need Photoshop skills to restore old photos?
Not anymore. AI tools handle the full restoration workflow automatically. You upload the photo, the AI processes it, and you download the result. If you already know Photoshop, you can combine both tools for an even better outcome on tricky photos.
How to restore old photos in Photoshop step by step?
The typical workflow: duplicate the background layer, adjust Curves or Levels for tonal correction, use the Healing Brush to fix scratches one by one, add a Color Balance or Hue/Saturation layer for color, apply Unsharp Mask for sharpening, then flatten and export. Each step requires manual decisions about settings and blend modes.
Can AI handle torn or ripped photos?
AI can fix the visible parts of a torn photo (correct fading, sharpen faces, remove scratches), but it leaves missing sections as-is. It cannot invent image content. For reconstruction of missing areas, you need Photoshop's Content-Aware Fill or a professional retoucher.
What about Photoshop Neural Filters for restoration?
Adobe added a Photo Restoration neural filter that automates scratch removal and damage repair inside Photoshop. It is convenient if you already subscribe, though dedicated AI restoration services tend to produce more consistent results since they are built specifically for this task.
Is it worth combining AI and Photoshop?
For difficult photos, yes. AI clears the broad damage (fading, color casts, scattered scratches), and Photoshop handles the remaining details that need a human eye. Professional retouchers increasingly work this way because it cuts editing time roughly in half.
What about colorizing black-and-white photos?
This is where the gap between methods is biggest. Hand-coloring in Photoshop takes 3 to 4 hours of painstaking brush work. AI colorization produces realistic results in seconds. Even experienced Photoshop users now start with AI colorization and tweak individual colors manually if needed.
Which is more cost-effective for restoring 10 to 20 photos?
AI restoration at $0.50 per photo is far cheaper than a Photoshop subscription ($23/month). Unless you already use Photoshop for other work, the per-photo pricing model makes more financial sense for a one-time family photo project.
What can AI fix that Photoshop cannot?
AI face sharpening recovers detail that manual Photoshop sharpening cannot. When a face is blurry in the original, Unsharp Mask can only enhance what is already there. AI generates plausible facial detail (sharper eyes, skin texture) based on patterns it learned from millions of photos.
Should I learn Photoshop for photo restoration in 2026?
Only if you plan to do professional-level retouching or need creative control over specific projects. For restoring family photos, the learning investment is hard to justify when AI produces excellent results out of the box.
Can I restore photos without any software or subscription?
Yes. Web-based AI restoration tools run in your browser. You do not need to install anything. Upload your photo, download the result, and you are done. Two free restorations with no account or credit card required.


